
Introduction
As late August rolls around, we all reach that awkward in-between stage of the year. The weather is still warm enough for linen shorts and iced coffee, but our hearts (and Pinterest feeds!) are dreaming of cozy sweaters, pumpkin spice, and crunchy leaves. You might not be ready to jump straight into deep black or spooky Halloween designs, but bright neon pinks and fiery corals are starting to feel a little out of place.
That is where trendy summer to fall nail art ideas 2026 come into play! Transitional nail art is all about creating a soft balance. It bridges the gap by taking your favorite light, airy summer techniques—like jelly polish, chrome powders, micro-French tips, and negative space—and updating them with richer, earthier, late-summer colors. Think warm cacao brown, toasted caramel, dusty lavender-gray, smoky blue, and champagne gold.
In this comprehensive guide, we are sharing 8 of the absolute best transitional manicure ideas that you can easily recreate at home. Whether you love short square natural nails or long almond gel extensions, these designs will elevate your look without requiring hours at an expensive salon. Get ready to upgrade your beauty routine, stock your nail kit, and save these gorgeous looks straight to your favorite Pinterest boards!
Why This Trend Is Popular
Transitional nail art has blown up on Pinterest and TikTok for 2026, and it is easy to see why! Here are the main reasons everyone is obsessed with late-summer-to-early-fall manicures:
- Versatility with Outfits: In late August and September, your wardrobe is a mix of denim shorts, light cardigans, sun dresses, and ankle boots. Transitional nails match both bright summer outfits and earthy fall layers.
- Cost & Time Savings: Instead of changing your polish every week to keep up with shifting weather, transitional shades naturally last through the changing seasons.
- The “Quiet Luxury” Aesthetic: Muted earth tones, champagne shimmers, and delicate linework scream effortless elegance without trying too hard.
- Creative Fun: Combining summer textures (like translucent jellies or glossy chrome) with fall colors (like chocolate brown or plum) lets you experiment with fun, unexpected combinations.
Materials and Tools Needed
You do not need a professional nail salon setup to create stunning nail art at home. A basic DIY manicure kit with a few special nail art tools will give you salon-quality results!
Basic Manicure Prep
- Nail clippers and a 180-grit nail file
- Cuticle pusher and cuticle oil
- Rubbing alcohol or nail dehydrator pads
- Clear base coat and ultra-glossy top coat
Specialized Nail Art Tools
- Fine Detail Liner Brushes: Essential for crisp French tips, micro-lines, and detailed patterns.
- Dotting Tools: Great for creating polka dots, flowers, and leopard spots.
- Makeup Sponges: Perfect for smooth ombre gradients and aura effects.
- Chrome Powder & Silicone Applicator: Adds a high-shine metallic mirror finish.
- LED/UV Lamp: Required if you are using gel polishes for long-lasting wear.
Safety Tips
Doing your own manicures at home is super fun, but safety and nail health should always come first!
- Work in a Well-Ventilated Area: Nail polish and acetone fumes can cause headaches. Open a window or work near a fan.
- Avoid Curing Gel on Skin: If you use gel polish, wipe off any excess polish from your cuticles or side walls before putting your hand under the UV/LED light. This prevents skin allergies.
- Never Scrap or Peel Off Polish: Peeling off gel or regular polish strips away the top layers of your natural nail, leaving them thin and brittle. Always soak off polish gently with pure acetone.
- Patch Test Chrome Powders and Glues: If you have sensitive skin, test new products on one finger first to make sure you don’t experience an allergic reaction.
8 Trendy Summer to Fall Nail Art Ideas 2026
1. Rich Cacao Chocolate Chrome Nails
Introduction
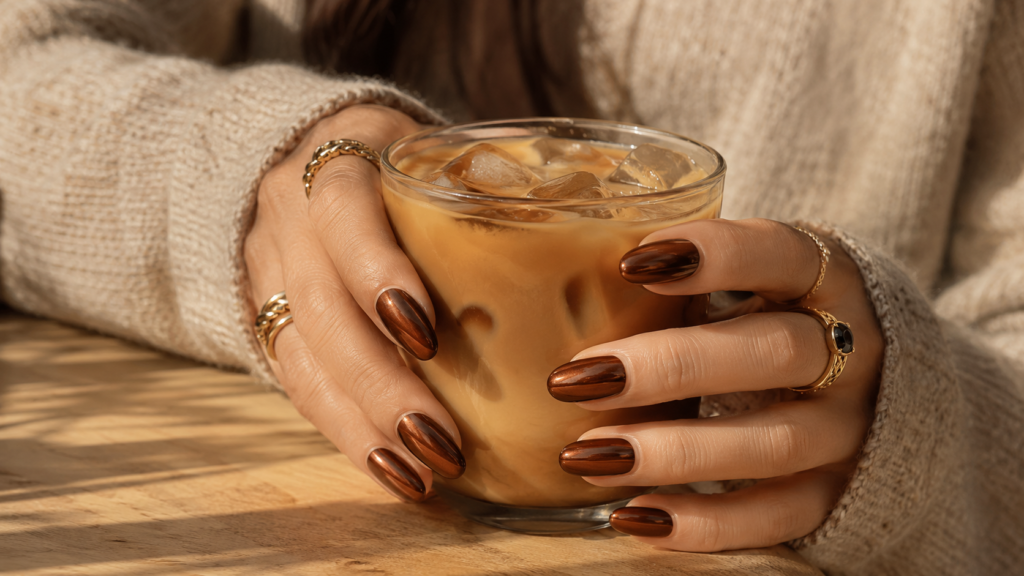
Brown is officially the new black for 2026! The Rich Cacao Chocolate Chrome manicure takes the warm, cozy energy of hot cocoa and combines it with the trendy, high-shine glaze finish that dominated summer. The result is a jaw-dropping, mirror-like finish that looks incredibly expensive and chic.
Why You’ll Love This Idea
It is the ultimate “quiet luxury” look for early fall. The chrome powder reflects light like liquid metal, making deep chocolate brown feel fresh, modern, and bright enough for sunny late-summer days.
Materials Needed
- Dark cacao brown gel polish
- No-wipe gel top coat
- Bronze or fine champagne/gold chrome powder
- Silicone sponge tool or eyeshadow applicator
- UV/LED nail lamp
Step-by-Step Instructions
- Prep the Nails: Trim, shape your nails into a short square or oval, push back cuticles, and wipe clean with alcohol.
- Apply Base Coat: Apply a thin layer of gel base coat and cure under your LED lamp for 60 seconds.
- Apply Cacao Polish: Paint two thin coats of deep cacao brown gel polish. Cure each coat for 60 seconds.
- Apply No-Wipe Top Coat: Cover with a thin coat of no-wipe gel top coat and cure for 30 seconds only (it needs to be slightly tacky for the powder to stick).
- Buff On Chrome: Dip your silicone tool into the chrome powder and gently rub it onto the nail until a smooth, shiny mirror finish forms.
- Dust Away Excess: Use a fluffy makeup brush to gently wipe away loose chrome powder.
- Seal and Protect: Apply a final thick layer of glossy top coat, capping the free edge, and cure for 60 seconds.
- Hydrate: Finish with a drop of nourish cuticle oil.
Beginner Tips
If your chrome looks glittery instead of smooth like a mirror, you cured your top coat for too long before applying the powder! Try curing for just 25 to 30 seconds.
Common Mistakes to Avoid
- Forgetting to cap the free tip of the nail with top coat, which causes the chrome to rub off at the edges after a day or two.
- Applying chrome over regular air-dry polish without a special water-based topcoat (it will turn cloudy!).
Styling or Decorating Ideas
Pair these glossy chocolate nails with chunky gold rings, cream knits, or a tan leather tote bag.
Best Colors and Materials
Deep cacao gel polish, espresso brown, champagne gold chrome powder.
Quick Info Table
| Detail | Specification |
| Estimated Cost | $12 – $20 |
| Estimated Time | 35 – 45 Minutes |
| Difficulty Level | Easy to Intermediate |
| Where It Looks Best | Short square nails or medium almond shape |
Pinterest-Worthy Tip
Take a photo outdoors during golden hour while holding a warm iced latte. The sunlight catches the mirror-like chrome perfectly!
Conclusion
Rich Cacao Chocolate Chrome nails are the single easiest way to jump on the top color trend of 2026 while keeping your style modern and polished.
2. Modern Tortoiseshell French Tips
Introduction
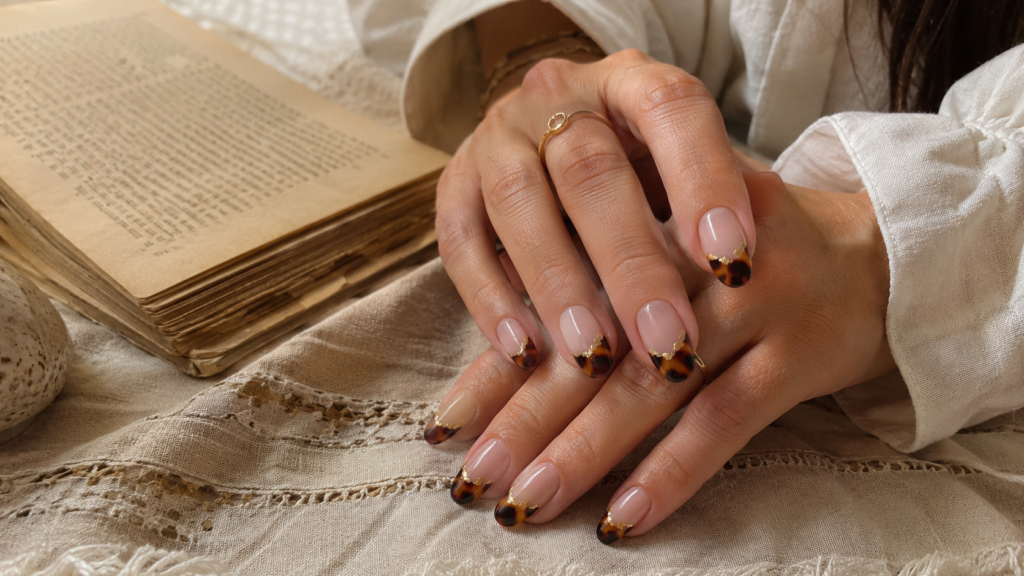
Tortoiseshell is a timeless autumn print, but applying it over the entire nail can sometimes feel a bit heavy for late August. Enter the Modern Tortoiseshell French Tip! By combining semi-translucent amber patches with a clean, milky nude base, you get a chic design that feels light, playful, and totally modern.
Why You’ll Love This Idea
It offers the best of both worlds: a classic French manicure silhouette with a gorgeous caramel-and-chocolate pattern that whispers cozy autumn vibes.
Materials Needed
- Milky nude or sheer pink gel base polish
- Jelly yellow/amber gel polish
- Jelly brown gel polish
- Black gel polish
- Fine line nail art brush
Step-by-Step Instructions
- Prep & Base: Prep natural nails and apply your gel base coat. Cure for 60 seconds.
- Paint Milky Base: Apply 2 thin coats of milky nude polish to give the nails a soft, clean canvas. Cure each layer.
- Outline French Smile Line: Using your liner brush and amber jelly polish, paint a curved French tip along the edge of your nail.
- Dab Jelly Brown: While the amber tip is wet, dab small, irregular spots of jelly brown into the amber layer to let the colors bleed together gently.
- Add Black Specks: Flash cure for 10 seconds, then use a tiny dotting tool to add minute black specks inside the dark brown spots for realism. Cure for 60 seconds.
- Optional Gold Accent: Paint a razor-thin metallic gold chrome line right along the bottom edge of the French tip.
- Top Coat: Seal the entire nail with a plush, high-shine top coat and cure completely.
Beginner Tips
Don’t worry about making the tortoiseshell spots neat! Real tortoiseshell is organic and uneven, so messy dabs actually look more realistic.
Common Mistakes to Avoid
Making the black spots too large. Keep black specks tiny so the warm caramel and amber shades show through underneath.
Styling or Decorating Ideas
Complements denim jackets, tortoiseshell sunglasses, and tortoiseshell hair claws effortlessly.
Best Colors and Materials
Amber jelly, rich honey brown, deep black, milky pink nude, gold micro-foil.
Quick Info Table
| Detail | Specification |
| Estimated Cost | $15 – $25 |
| Estimated Time | 45 – 50 Minutes |
| Difficulty Level | Intermediate |
| Where It Looks Best | Medium almond or coffin nail shapes |
Pinterest-Worthy Tip
Shoot your photo resting your hand over the cover of a vintage hardback book or a textured beige linen napkin for that effortless dark-academia Pinterest aesthetic.
Conclusion
Modern Tortoiseshell French Tips are artistic, cozy, and sophisticated—making them a must-try transition manicure this season.
3. Cool Muted Lavender “Veil” Nails

Introduction
Forget sugary, bright spring pastels—in 2026, lavender is officially moving into fall! Cool Muted Lavender Veil nails feature a smoky, milky lilac tone with a dusty gray undertone. It acts as a stunning “unexpected neutral” that bridges bright summer sun with cool autumn breezes.
Why You’ll Love This Idea
If you aren’t ready for super dark browns or vampy reds yet, this soft, dreamy color gives you a refreshing break while still feeling tone-appropriate for early September.
Materials Needed
- Muted, dusty lavender/lilac polish
- Sheer milky white polish
- Fine pearl or iridescent micro-shimmer top coat
- Matte or glossy top coat
Step-by-Step Instructions
- Nail Preparation: Clean and prep nails, removing all natural oils.
- Base Coat: Apply your favorite smoothing base coat and allow it to dry/cure.
- Apply Muted Lavender: Paint two thin, even coats of dusty lavender polish.
- Milky Overlay: Paint one ultra-thin coat of sheer milky white over top to create the soft, cloudy “veil” effect.
- Shimmer Finish: Add a single layer of micro-pearl top coat to give the nails a subtle, dreamy glow.
- Seal: Finish with a glossy top coat for a liquid glass look, or a matte top coat for a soft velvet finish.
Beginner Tips
Look for lavender polishes that have “gray” or “smoke” in the color description. Avoid bright neon or candy-pink purples so the look stays earthy and transitional.
Common Mistakes to Avoid
Applying the milky white layer too thick, which completely hides the lovely lavender color underneath.
Styling or Decorating Ideas
Looks gorgeous alongside cozy gray sweater knits, silver jewelry, and soft pearl accessories.
Best Colors and Materials
Dusty lilac, lavender milk, pearl chrome dust, milky white.
Quick Info Table
| Detail | Specification |
| Estimated Cost | $10 – $18 |
| Estimated Time | 25 – 35 Minutes |
| Difficulty Level | Beginner Friendly |
| Where It Looks Best | Short natural round or active square nails |
Pinterest-Worthy Tip
Overlay a video clip on Pinterest showing the subtle pearl shimmer catching light as you move your fingers against a soft wool blanket.
Conclusion
Muted Lavender Veil nails prove that soft colors can look totally sophisticated and seasonal all year round.
4. Cranberry Red & Caramel Skittle French

Introduction
Can’t decide on just one transitional color? You don’t have to! The Cranberry Red & Caramel Skittle French manicure takes the playful multi-color trend from summer and updates it with a rich late-summer color palette. By painting micro French tips in alternating autumn-prep colors across each finger, you create a fun, eye-catching look.
Why You’ll Love This Idea
It incorporates all the best transitional shades—cranberry red, warm caramel, muted navy, olive, and chocolate—into one cohesive, non-boring set.
Materials Needed
- Sheer nude base coat
- Cranberry red polish
- Caramel brown polish
- Dusty olive green polish
- Smoky blue-gray polish
- Ultra-fine liner brush
Step-by-Step Instructions
- Nail Prep: Shape nails into a sleek oval or almond shape and clean the nail bed.
- Nude Base: Apply two coats of sheer nude or pale translucent pink to keep the nail bed looking clean and bright.
- Thumb (Cranberry): Use your liner brush to draw a delicate French tip in rich cranberry red.
- Index (Caramel): Paint the next French tip in a warm, buttery caramel shade.
- Middle (Smoky Blue): Use smoky blue-gray on the middle finger.
- Ring (Olive Green): Paint a muted olive green tip on the ring finger.
- Pinky (Cacao): Finish with deep chocolate brown on the pinky nail.
- Seal: Coat all nails in a high-shine topcoat to unify the design.
Beginner Tips
To keep French tip lines clean and sharp, hold your liner brush steady and rotate your finger under the brush instead of moving the brush itself!
Common Mistakes to Avoid
Making the French tip arc too thick. Keep the tips thin (“micro French”) so plenty of natural nude nail bed shows through.
Styling or Decorating Ideas
Matches almost any early-autumn handbag or shoe option because every key seasonal accent color is included on your fingers!
Best Colors and Materials
Cranberry, warm caramel, olive green, blue-gray, cacao brown, sheer nude base.
Quick Info Table
| Detail | Specification |
| Estimated Cost | $15 – $22 |
| Estimated Time | 40 – 50 Minutes |
| Difficulty Level | Intermediate |
| Where It Looks Best | Medium almond or squoval nails |
Pinterest-Worthy Tip
Pose holding a ceramic mug filled with hot tea or holding a bunch of early fall wildflowers to showcase all five colors clearly in frame.
Conclusion
This Skittle French design is energetic, chic, and ideal for anyone who loves variety in their manicure!
5. Royal Blue Dusk Aura Nails
Introduction
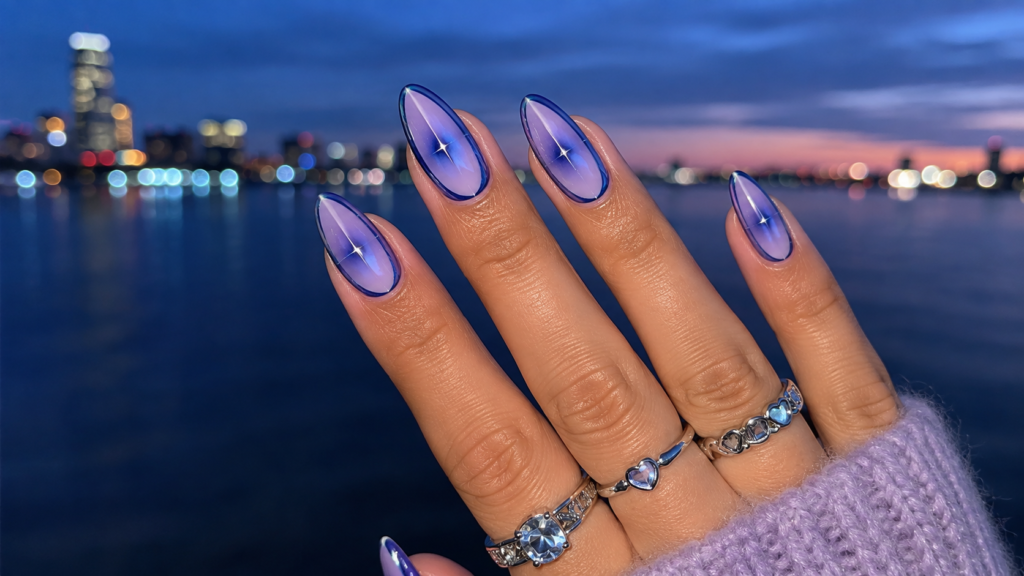
Aura nails were everywhere this summer, featuring bright neon centers. For late summer and early fall 2026, the trend gets a moody makeover with Royal Blue Dusk Aura nails. Combining deep royal blue or navy with a soft lavender or milky nude center, this look captures the exact colors of a beautiful late-August twilight sky.
Why You’ll Love This Idea
It is deeply artistic, mystical, and stylish. The deeper blue maintains the fun, colorful energy of summer while introducing a cooler, moodier vibe for September.
Materials Needed
- Milky nude base polish
- Royal blue or navy gel polish
- Lavender gel polish
- Small dense makeup sponge or blooming gel
- Glossy top coat
Step-by-Step Instructions
- Prep: Shape nails, apply base gel, and cure for 60 seconds.
- Background Color: Apply two coats of milky nude polish and cure completely.
- Sponge Method (Option A): Apply a circle of royal blue gel onto a cosmetic wedge sponge, with a tiny drop of lavender gel in the center. Gently dab the sponge onto the middle of your nail to create a diffused gradient blooming outward.
- Blooming Gel Method (Option B): Apply a layer of clear blooming gel (do not cure). Dot royal blue in the center and watch it spread outward into a soft aura ring. Flash cure.
- Build Intensity: Repeat step 3 or 4 a second time to make the center color pop.
- Top Coat: Seal with a thick layer of top coat to smooth out any sponge texture and cure for 60 seconds.
Beginner Tips
If using the sponge technique, make sure to apply latex tape or liquid peel-off tape around your cuticles first for super fast, mess-free cleanup!
Common Mistakes to Avoid
Using a sponge that is too wet or over-saturated, which leaves harsh blobs instead of a soft, hazy aura glow.
Styling or Decorating Ideas
Complements dark denim jackets, silver rings, obsidian crystals, and celestial accessories.
Best Colors and Materials
Royal blue, deep navy, muted lilac, milky nude, top coat.
Quick Info Table
| Detail | Specification |
| Estimated Cost | $12 – $20 |
| Estimated Time | 35 – 45 Minutes |
| Difficulty Level | Intermediate |
| Where It Looks Best | Long almond or coffin nails |
Pinterest-Worthy Tip
Film a short video against a sunset backdrop to emphasize how the aura colors mimic the dusk horizon!
Conclusion
Royal Blue Dusk Aura nails give you an ethereal, artistic manicure that stands out in any crowd.
6. Smoky Berry Jelly Nails
Introduction
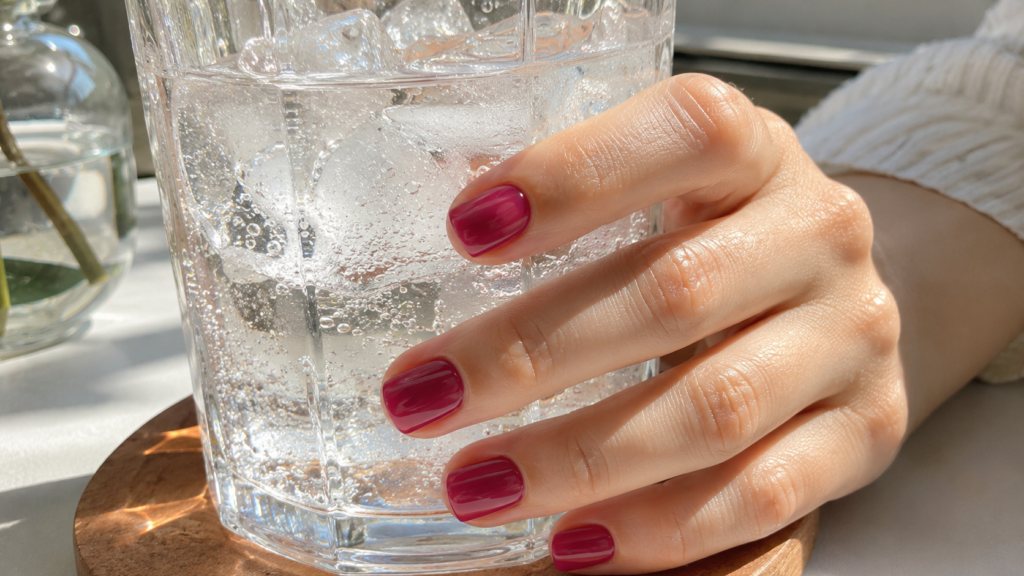
Jelly nails—polishes with a sheer, translucent, glassy finish—were huge all summer long. Rather than abandoning translucent nails when autumn arrives, simply deepen the tint! Smoky Berry Jelly nails combine the glassy shine of summer with rich raspberry, plum, and dark cherry shades.
Why You’ll Love This Idea
It gives your nails a juicy, high-gloss “stained glass” appearance. It feels lighter and fresher than heavy opaque dark polishes, making it perfect for early September days.
Materials Needed
- Sheer plum, raspberry, or dark cherry jelly polish
- (Alternative DIY: Clear top coat + a few drops of opaque dark wine polish)
- Base coat and plumping gel-effect top coat
Step-by-Step Instructions
- Prep: File nails cleanly into short natural squares or smooth ovals.
- Base Coat: Apply base coat and let dry thoroughly.
- First Jelly Coat: Apply one thin coat of your translucent berry jelly polish. It will look light and tinted.
- Second Jelly Coat: Apply a second coat to deepen the berry pigment while preserving translucency.
- Third Coat (Optional): Add a third coat only to the tips if you want a natural, glassy gradient effect.
- Plumping Top Coat: Finish with two coats of a thick, ultra-glossy top coat to create that signature squishy, glass-like jelly look!
Beginner Tips
Don’t have a jelly polish? Make your own at home! Mix 4 drops of dark cherry or plum polish into a bottle of clear top coat and shake well.
Common Mistakes to Avoid
Applying coats too thickly. Thick coats ruin the translucent “stained-glass” transparency that makes jelly nails unique.
Styling or Decorating Ideas
Looks stunning with gold stacked rings, satin slip dresses, or casual white button-down shirts.
Best Colors and Materials
Raspberry jelly, plum-purple, wine tint, ultra-glossy gel top coat.
Quick Info Table
| Detail | Specification |
| Estimated Cost | $8 – $15 |
| Estimated Time | 20 – 30 Minutes |
| Difficulty Level | Very Easy |
| Where It Looks Best | Short square or active natural nails |
Pinterest-Worthy Tip
Hold a fresh berry or a glass of sparkling water near a window—the sunlight passing through your translucent nails looks incredible on camera!
Conclusion
Smoky Berry Jelly nails are quick, super easy, and deliver high fashion results with minimal effort.
7. Champagne Gold Micro-Accent Minimalist Nails
Introduction
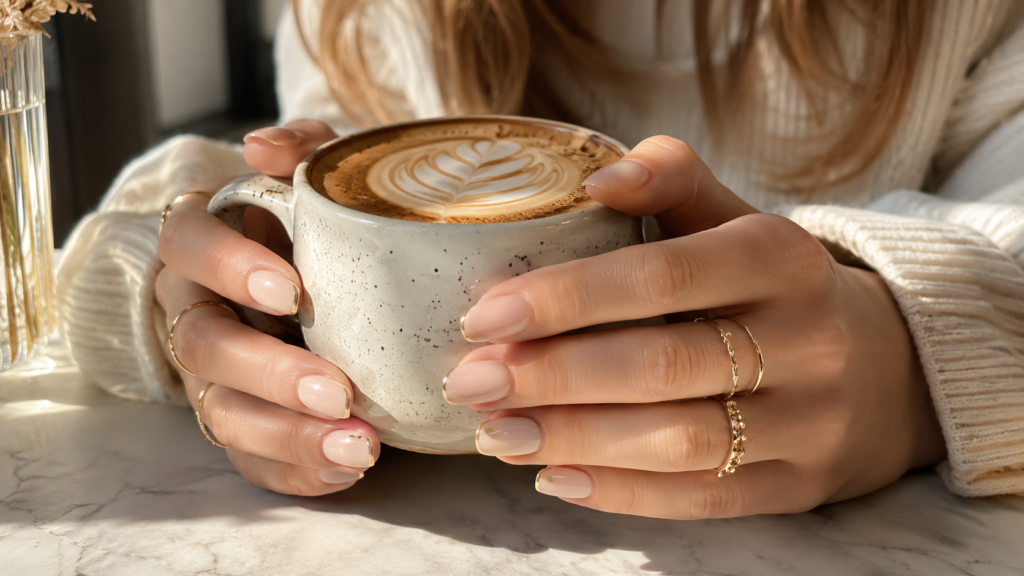
If you adore simple, “your nails but better” manicures, this design is tailored for you! The Champagne Gold Micro-Accent look features a flawless, milky-nude base decorated with tiny, delicate warm gold chrome accents—like micro dots, ultra-thin French lines, or delicate stars.
Why You’ll Love This Idea
It is the ultimate clean-girl manicure. Replacing bright summer silver chrome with warm champagne gold instantly adds cozy autumn warmth without feeling dark or heavy.
Materials Needed
- Milky nude or semi-sheer beige base polish
- Champagne gold metallic paint or chrome powder
- Micro dotting tool or ultra-fine liner brush
- Glossy top coat
Step-by-Step Instructions
- Prep: Perform a clean cuticle manicure and shape nails smoothly.
- Milky Base: Apply two coats of milky beige polish for a clean, even base. Cure or let dry completely.
- Accent Design (Pick One):
- Option A: Use a fine liner to paint a hairline-thin gold tip on each nail.
- Option B: Use a dotting tool to place a single micro-gold dot near the cuticle base of each nail.
- Option C: Paint tiny gold starbursts on two accent nails.
- Cure/Dry: Cure the gold accents for 30–60 seconds.
- Seal: Apply a glossy top coat over everything and seal the tips properly.
Beginner Tips
Less is more! Keep the gold accents as small as possible. The charm of this look relies on negative space and subtlety.
Common Mistakes to Avoid
Placing too many gold stars or thick lines, which makes the look feel busy rather than elegant and minimalist.
Styling or Decorating Ideas
Complements champagne-colored silk blazers, gold chain necklaces, and minimalist wristwatches.
Best Colors and Materials
Milky nude, sheer pale pink, champagne chrome, warm metallic gold.
Quick Info Table
| Detail | Specification |
| Estimated Cost | $10 – $16 |
| Estimated Time | 25 – 30 Minutes |
| Difficulty Level | Easy |
| Where It Looks Best | Any length, especially short neat natural nails |
Pinterest-Worthy Tip
Shoot a close-up macro shot of your hand resting over a warm cup of cappuccino with delicate latte art.
Conclusion
Champagne Gold Micro-Accent nails are understated, incredibly chic, and effortless to wear anywhere.
8. Reverse Polka Dot Cacao Manicure
Introduction
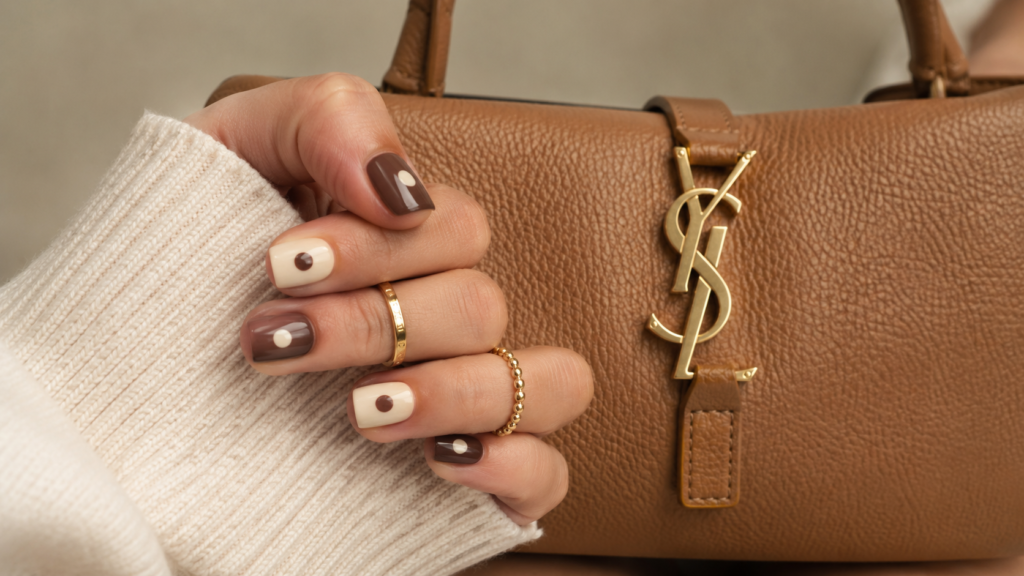
Polka dots made a huge comeback earlier this year, and for late summer to fall 2026, they get a clever update: the Reverse Polka Dot Cacao manicure! Instead of bright white dots on bright colors, this design mixes dark cacao brown dots over milky cream bases, or pale caramel dots over dark chocolate backgrounds across different nails.
Why You’ll Love This Idea
It’s retro ’90s nostalgia meets modern autumn tones. It’s playful, customizable, and surprisingly easy to do yourself at home!
Materials Needed
- Dark cacao brown polish
- Milky cream/oatmeal polish
- Warm caramel polish
- Medium nail dotting tool
- Top coat
Step-by-Step Instructions
- Prep: File nails into neat short square shapes—a big ’90s trend for 2026!
- Base Layering:
- Paint your thumb, middle, and pinky nails with milky cream polish.
- Paint your index and ring nails with deep cacao brown polish.
- Create Dots on Cream Nails: Dip your dotting tool into cacao brown polish and place 3 to 5 evenly spaced dots on the cream nails.
- Create Dots on Brown Nails: Dip your dotting tool into milky cream or caramel polish and place dots on the dark brown nails.
- Dry/Cure: Let the dots set for 2 minutes (or cure under LED light for 60 seconds).
- Top Coat: Apply a generous layer of top coat gently so you don’t smear the dots.
Beginner Tips
Dip your dotting tool into fresh polish before making every single dot so that all your polka dots remain identical in size!
Common Mistakes to Avoid
Dragging the dotting tool like a brush! Always tap the tool straight down and lift straight up.
Styling or Decorating Ideas
Pairs perfectly with trench coats, plaid blazers, white sneakers, and vintage denim jeans.
Best Colors and Materials
Cacao brown, warm caramel, cream oatmeal, dotting tools.
Quick Info Table
| Detail | Specification |
| Estimated Cost | $10 – $18 |
| Estimated Time | 30 – 40 Minutes |
| Difficulty Level | Easy |
| Where It Looks Best | Short square nails |
Pinterest-Worthy Tip
Arrange your hand holding a brown leather sunglasses case or vintage trench coat lapel for a classic autumn flat-lay shot.
Conclusion
Reverse Polka Dot Cacao nails bring a cheerful, stylish spin to traditional autumnal earth tones.
Expert Decorating & Nail Care Tips
To ensure your transitional DIY manicures look salon-fresh for up to three weeks, follow these professional nail technician tips:
- Prioritize Nail Dehydration: Before applying any polish, wipe your natural nail plate with 90% rubbing alcohol or pure acetone. Removing natural oils prevents polish from lifting early.
- Invest in Quality Top Coats: A high-grade, plumping top coat protects your art from chipping and gives that thick, expensive gel look—even with regular air-dry polish.
- Oil Your Cuticles Daily: Late summer sun and early autumn air can dry out your skin. Applying jojoba-based cuticle oil twice a day keeps cuticles soft and prevents unsightly hangnails.
- Wrap the Free Edge: Always swipe your polish brush along the top edge/tip of your nail. Sealing the edge prevents water from getting under the polish when you wash dishes or shower.
Budget-Saving Tips for DIY Nail Art
You don’t need to spend hundreds of dollars at nail salons to enjoy beautiful trend-setting nails. Save money with these smart DIY hacks:
- Household Dotting Tools: Don’t have professional dotting tools? The end of a bobby pin, the tip of a toothpick, or the head of a sewing pin inserted into a pencil eraser work just as well!
- Mix Your Own Shades: Instead of buying dozens of transitional polishes, mix a drop of brown or black into your bright summer polishes to instantly create custom muted fall shades.
- Makeup Sponge Hacks: Cheap foam wedge makeup sponges from the drugstore are the absolute best tool for smooth ombres, gradients, and aura nail art.
Frequently Asked Questions (FAQs)
1. What are the top nail colors for the summer-to-fall transition in 2026?
The standout transitional shades for 2026 include cacao brown, warm caramel, muted dusty lavender, cranberry red, smoky blue-gray, olive green, and champagne gold chrome.
2. When should I switch from summer to fall nail designs?
Late August through late September is the ideal window for transitional nail designs. It lets you gently shift away from neon summer shades before diving into heavy dark winter polishes.
3. What nail shape is trending for late summer and early fall 2026?
Short square nails and medium almond shapes are leading the trends for 2026. Both offer a clean, practical, and highly polished appearance.
4. How can I make my DIY gel manicure last longer?
Proper prep is key! Lightly buff the nail surface, dehydrate with alcohol, avoid getting polish on your skin, and cap the free edges with top coat before curing under the LED light.
5. Can I create tortoiseshell nail art with regular air-dry polish?
Yes! However, gel polish works best because jelly gel layers bleed together smoothly before curing, giving that seamless depth real tortoiseshell is famous for.
6. Are chrome powders safe to use on natural nails?
Yes, chrome powders are safe! Always apply chrome powders over a cured base layer/top coat rather than directly on your bare natural nail plate.
7. How do I turn a summer neon polish into an early fall shade?
Mix a tiny drop of dark brown or smoky gray polish into your neon shade on a palette. This tempers the brightness and creates a rich, muted tone ideal for autumn.
8. Is lavender really a fall color for 2026?
Yes! Lavender has moved from a purely spring/summer pastel to a cool, dusty, milky neutral that pairs gorgeously with autumn knits and leather coats.
Final Thoughts
Transitioning your style from summer to fall doesn’t mean you have to toss out all your fun nail art techniques or hide under super dark polishes overnight. By embracing trendy summer to fall nail art ideas 2026, you get to play with the best elements of both seasons! From glossy cacao chrome to delicate champagne gold micro-accents, these 8 ideas offer something beautiful for every style preference and skill level. Grab your tools, pick your favorite look, and enjoy a fresh, gorgeous manicure today!
📌 Save This Post on Pinterest!
Did you fall in love with these late-summer to early-fall nail ideas? Hover over any image in this article and click the “Pin It” button to save it directly to your Pinterest Nail Inspiration Board! Don’t forget to share this post with a friend who loves DIY beauty projects!