
Introduction
There is something undeniably magical about the arrival of autumn. As the crisp breeze sets in, the leaves turn into brilliant shades of amber, rust, and gold, and our hearts naturally crave warmth, comfort, and cozy gathering spaces. While we often focus on making our living rooms and kitchens feel snug for the season, your front porch is the true hero of autumn curb appeal. It is the very first thing your neighbors, guests, and family see, setting a hospitable and cheerful tone for your entire home.
Creating cozy fall porch magic isn’t about spending a fortune or completely rebuilding your entryway. Instead, it is about layered textures, glowing lights, natural elements, and thoughtful accents that say, “Welcome, pull up a chair, and stay a while.” Whether you have a sprawling wrap-around porch, a cute suburban stoop, or a tiny apartment entryway, autumn decor offers endless creative opportunities.
From glowing lantern pathways and stacked heirloom pumpkin towers to plush plaid throws and scent-infused autumn wreaths, transforming your porch can be one of the most satisfying weekend projects of the year. Plus, as Pinterest boards fill up with seasonal aesthetic inspiration, having an inviting porch gives your home that effortless, magazine-worthy charm every lifestyle lover dreams of.
In this ultimate guide, we are diving deep into 8 stunning, easy-to-recreate decor ideas complete with exact step-by-step instructions, cost breakdowns, color palettes, and Pinterest-pro styling secrets. Grab a mug of hot apple cider, wrap yourself in your favorite sweater, and let’s bring some cozy seasonal charm to your doorstep!
Why The Cozy Fall Porch Trend Is Sweeping Pinterest
The home decor community on Pinterest has completely embraced autumn front porch styling in recent years, and it is easy to see why. The front entrance serves as the visual bridge between your home’s interior and the outside world. Here are a few reasons why this trend continues to dominate search feeds every single year:
- Visual Comfort: Warm color palettes featuring terracotta, mustard yellow, and deep forest green trigger feelings of safety, comfort, and nostalgia.
- Biophilic Design & Nature: Autumn decor relies heavily on natural, low-cost elements like pumpkins, dried corn husks, straw bales, and eucalyptus, making it grounded and organic.
- High-Impact Curb Appeal: Seasonal decor gives your home an instant face-lift without requiring permanent structural changes or massive investments.
- Layering Potential: Fall is all about texture—combining chunky knits, woven baskets, rough woods, and soft candlelight creates visual depth that photographs beautifully for social media.
Essential Materials and Tools Needed
To bring these decor ideas to life, having a few staple supplies on hand will make your decorating weekend smooth and seamless.
| Category | Essential Items |
| Natural Elements | Real or faux heirloom pumpkins, corn stalks, straw bales, dried eucalyptus, wheat sheaves, mums. |
| Textiles | Buffalo check outdoor rugs, coir doormats, plaid throw blankets, weather-resistant pillow covers. |
| Lighting | LED flameless candles, string fairy lights, rustic metal lanterns, battery-operated timer lights. |
| Containers & Hardware | Wooden crates, galvanized metal buckets, woven baskets, command hooks, floral wire, zip ties. |
| Tools | Scissors, hot glue gun, wire cutters, broom, protective outdoor sealer spray. |
Important Outdoor Decor Safety Tips
Before you start styling your space, keep these important safety guidelines in mind to keep your family and guests safe throughout the autumn season:
- Stick to Flameless Candles: Real open flames in lanterns pose a serious fire hazard when placed near dry corn stalks, straw bales, or faux foliage. Always opt for battery-operated LED candles with built-in timers.
- Keep Walkways Clear: Ensure pathways, step surfaces, and doorway thresholds remain free of trip hazards like loose pumpkins or hanging cords.
- Secure Lightweight Decor: Fall winds can easily knock over tall corn stalks or blow away light baskets. Secure items using heavy bricks placed inside crates or anchor tall items with zip ties.
- Use Weather-Rated Electronics: Ensure all extension cords, fairy lights, and outlet timers are strictly rated for outdoor use to avoid short circuits during rain or dew.
8 Detailed Cozy Fall Porch Decor Ideas
1. The Rustic Stacked Heirloom Pumpkin Tower
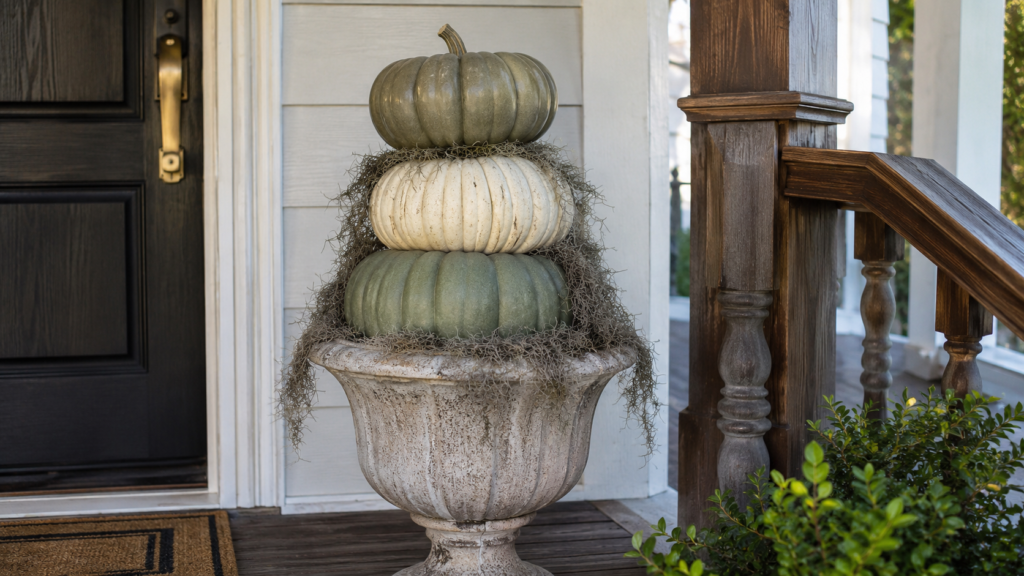
Creating a vertical pumpkin display using muted heirloom varieties brings immediate sophistication and dynamic height to your front entrance. Moving away from standard orange, this design focuses on sage greens, dusty whites, and soft blush tones.
+-------------------------------------------------------------+
|                     TRIPLE PUMPKIN TOWER                    |
|                                                             |
|                          (  Top  )                          |
|                         /  Small  \                         |
|                       +-------------+                       |
|                      /   Medium      \                      |
|                     +-----------------+                     |
|                    /     Large         \                    |
|                   +---------------------+                   |
|                   |   Urn / Planter     |                   |
|                   +---------------------+                   |
+-------------------------------------------------------------+
Why You’ll Love This Idea
It delivers dramatic visual impact without taking up excessive floor space, making it perfect for both small stoops and large porches.
Materials Needed
- 3 real or foam heirloom pumpkins (1 large, 1 medium, 1 small)
- Large concrete or terra-cotta planter urn
- Potting soil or heavy floral foam
- Wooden dowel rod (1/2 inch thick, 2-3 feet long)
- Preserved Spanish moss or faux eucalyptus greenery
- Drill with spade bit (if using real pumpkins) or craft knife (if foam)
Step-by-Step Instructions
- Prepare the Base Planter: Fill your urn with heavy soil or floral foam to create a sturdy, weighted foundation that won’t tip over in high winds.
- Prepare the Base Pumpkin: Remove the stem completely from your largest pumpkin so it lays completely flat.
- Core the Base Pumpkin: Carefully drill or cut a vertical hole directly through the center of the largest pumpkin from top to bottom.
- Anchor the Dowel: Drive your wooden dowel firmly into the center of the urn’s soil base, leaving 1.5 to 2 feet exposed vertically.
- Thread the First Level: Slide your largest pumpkin down the dowel rod until it rests snugly on top of the urn rim.
- Prepare and Thread the Middle Level: Snap the stem off the medium pumpkin, drill a hole through its center, and slide it down the dowel so it sits flat on the base pumpkin.
- Thread the Top Pumpkin: Drill a hole only through the bottom half of your smallest top pumpkin (keep its top stem intact for aesthetic appeal) and slide it onto the top of the dowel rod.
- Fill the Gaps: Tuck soft Spanish moss, real fall leaves, or leafy eucalyptus sprigs into the gaps between each stacked pumpkin level to hide seams.
Beginner Tips
- Use faux foam pumpkins if you want your display to last from September through November without rotting.
- Choose pumpkins with flatter tops so they stack naturally without wobbling.
Common Mistakes to Avoid
- Forgetting to remove stems on lower pumpkins, which creates an unstable, crooked tower.
- Placing raw, unsealed real pumpkins directly on porous concrete (use cardboard under base pumpkins to prevent dark moisture stains).
Styling & Decorating Ideas
Flank your front door with matching twin pumpkin towers to create symmetrical, formal balance, or place a single tower next to a cozy bench.
Best Colors & Materials
- Colors: Sage green (Jarrahdale), cream white (Lumina), pale peach (Cinderella).
- Materials: Aged terracotta urns, organic spanish moss, natural wood stems.
Quick Spec Sheet
- Estimated Cost: $35 – $65
- Estimated Time: 30–45 minutes
- Difficulty Level: Easy
- Where It Looks Best: Right beside the front door, on stair landings, or flanking a entryway bench.
- Pinterest-Worthy Tip: Spray foam pumpkins with a coat of chalk paint in “Matte Sage” or “Eggshell White” for a custom, high-end designer finish.
Conclusion
The heirloom pumpkin tower brings effortless cozy fall porch magic by combining height, texture, and unexpected organic colors into a show-stopping focal point.
2. Layered Doormat & Patterned Accent Rug
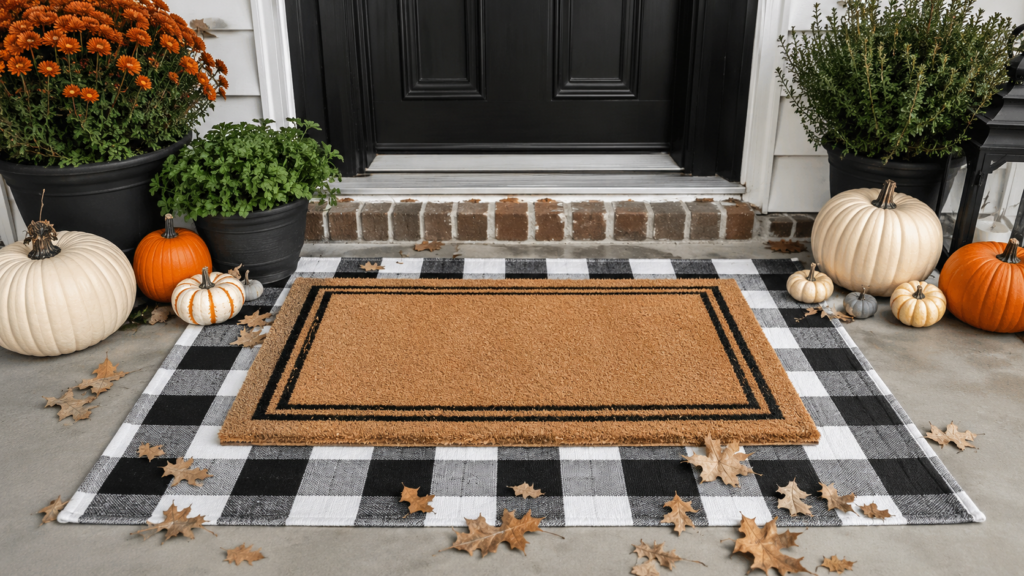
Layering a patterned outdoor rug under a classic natural coir doormat is the easiest way to add color, texture, and instant designer flair to your porch doorstep.
+-------------------------------------------------------------+
|                 LAYERED DOORMAT ARRANGEMENT                 |
|                                                             |
|       +---------------------------------------------+       |
|       |  Patterned Accent Rug (2' x 3' or 3' x 5')  |       |
|       |                                             |       |
|       |       +-----------------------------+       |       |
|       |       |   Natural Coir Doormat      |       |       |
|       |       |     ("Welcome", etc.)       |       |       |
|       |       +-----------------------------+       |       |
|       |                                             |       |
|       +---------------------------------------------+       |
+-------------------------------------------------------------+
Why You’ll Love This Idea
It is extremely affordable, takes less than five minutes to set up, and makes your front entry instantly feel warm, complete, and intentional.
Materials Needed
- Outdoor base rug (2′ x 3′ or 3′ x 5′) with geometric pattern (e.g., buffalo plaid or stripe)
- Natural coconut coir mat (18″ x 30″) with a seasonal quote or plain border
- Double-sided outdoor carpet tape
- Spray fabric protector (Scotchgard)
Step-by-Step Instructions
- Clean the Floor Surface: Sweep your front entryway porch floor thoroughly to remove dry dust, dirt, and stray leaves.
- Treat Your Base Rug: Coat your patterned base rug with outdoor spray sealant to protect it against water mildew and fading.
- Position the Base Rug: Lay down the larger patterned rug flat on the porch floor, centering it precisely in front of your doorway.
- Anchor Base Layer: Apply outdoor double-sided tape along the bottom edges of the base rug to prevent shifting in high winds.
- Position top Coir Mat: Place your smaller natural coir mat directly over the center of the base rug, leaving a neat 3 to 6-inch pattern border showing all around.
- Secure Top Layer: Secure the coir mat to the base rug using a strip of carpet tape to prevent tripping hazards.
- Clean Strikethroughs: Brush off loose loose coconut fibers from the coir top mat with your hand.
Beginner Tips
- The bottom rug should be at least 6 inches wider and longer than your top coir mat for proper visual proportions.
- Choose outdoor-rated washables for the bottom layer so you can easily clean off mud.
Common Mistakes to Avoid
- Using indoor cotton rugs that absorb rain, mold quickly, and ruin porch flooring.
- Selecting base rug patterns that clash with your exterior house paint or front door color.
Styling & Decorating Ideas
Pair a black-and-white buffalo check base rug with a warm coir mat stamped with “Hello Pumpkin” or a modern minimal monograms.
Best Colors & Materials
- Colors: Black & white plaid, warm rust orange, forest green, natural tan coir.
- Materials: Woven cotton-polyester blend outdoor rugs, rigid natural coconut husk fibers.
Quick Spec Sheet
- Estimated Cost: $25 – $45
- Estimated Time: 10 minutes
- Difficulty Level: Very Easy
- Where It Looks Best: Centered directly in front of the main exterior door threshold.
- Pinterest-Worthy Tip: Frame the layered rug setup with two medium-sized orange pumpkins placed on the outer corners of the bottom rug.
Conclusion
This simple combo grounds your porch design and adds instant cozy depth that elevates the entire look of your entrance.
3. Glowing Evening Lantern Pathway
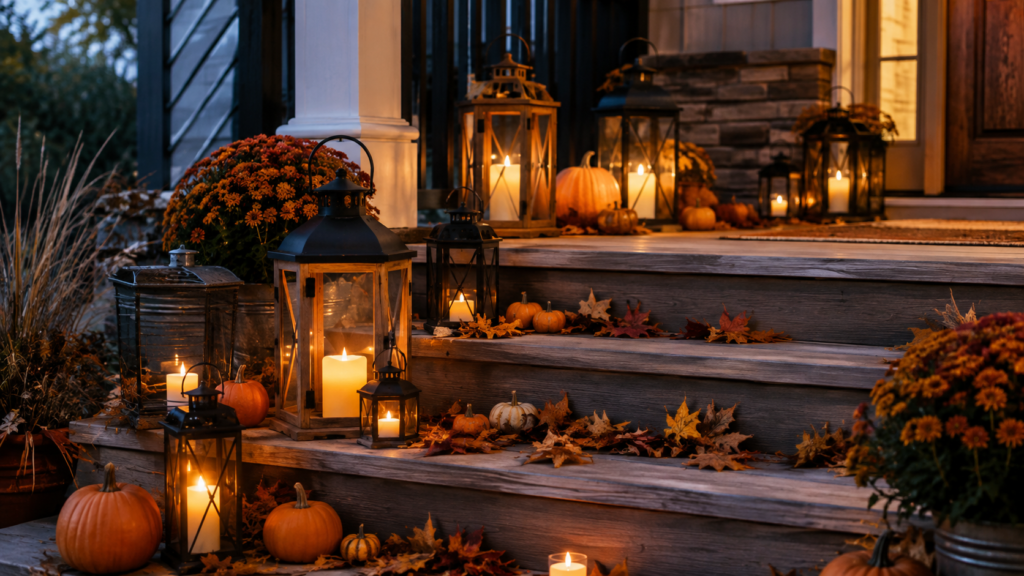
Warm outdoor lighting creates pure magic when the autumn sun sets early. Arranging metallic and wooden lanterns of varying heights filled with glowing flameless candles makes your entry feel magical and safe.
+-------------------------------------------------------------+
|                  GLOWING LANTERN PATHWAY                    |
|                                                             |
|   Step 3:  [Tall Lantern] + (Flameless Candle)              |
|   Step 2:  [Medium Lantern] + Mini Pumpkin                  |
|   Step 1:  [Short Lantern] + Eucalyptus Sprigs              |
+-------------------------------------------------------------+
Why You’ll Love This Idea
It brings instant warmth, comfort, and dramatic evening safety glow to your walkway without requiring complex electrical wiring.
Materials Needed
- 3 to 5 metal or wooden lanterns (varying sizes: small, medium, tall)
- Battery-operated LED pillar candles with built-in daily timers
- Faux autumn greenery (eucalyptus, berry garlands)
- Extra AA/AAA batteries
- Waterproof sealer or clear coat spray for wood lanterns
Step-by-Step Instructions
- Clean Lantern Glass: Wipe down all glass panes on your lanterns so the light output shines brightly without smears.
- Set Candle Timers: Turn on your battery-operated candles at dusk so their automatic 6-hour timers reset to light up every evening automatically.
- Anchor Candles: Use a small piece of double-sided mounting tape at the bottom of each candle to secure it flat inside the lantern bottom.
- Decorate Inside Interiors: Wrap small sprigs of faux fall berries or mini pinecones loosely around the base of the candles inside the glass enclosure.
- Arrange by Height: Stagger your lanterns along your front steps or doorway path, placing the tallest lantern at the back and shorter ones in front.
- Integrate Organic Accent: Nestle small pumpkins and gourds between the lantern bases to break up hard metallic lines.
- Test Evening Lighting: Step back at sunset to adjust spacing for optimal evening glow distribution.
Beginner Tips
- Always select LED candles with an automated 6-hour daily timer function so you never have to walk out in the cold to switch them on or off.
- Use battery candles with flickering flame effects for authentic cozy realism.
Common Mistakes to Avoid
- Using real wax candles outdoors that melt under lingering afternoon sunshine or blow out in gentle breezes.
- Using lanterns of all the exact same height, which looks flat and repetitive.
Styling & Decorating Ideas
Combine matte black iron lanterns with raw cedar wood lanterns for a charming, rustic-modern farmhouse look.
Best Colors & Materials
- Colors: Matte black, brushed bronze, distressed warm white, amber candle glow.
- Materials: Tempered glass, stainless steel, aged barnwood, plastic LED candles.
Quick Spec Sheet
- Estimated Cost: $40 – $90
- Estimated Time: 20 minutes
- Difficulty Level: Easy
- Where It Looks Best: Lined up along porch stairs, flanking the doorway, or lining a front pathway.
- Pinterest-Worthy Tip: Wind delicate copper wire battery fairy lights around the outer frame of the lanterns for an extra layer of fairy-tale glow.
Conclusion
A illuminated lantern display invites warmth into dark autumn nights, turning your porch into a magical, safe beacon of comfort.
4. Vintage Wooden Crate & Dried Corn Stalk Vignette
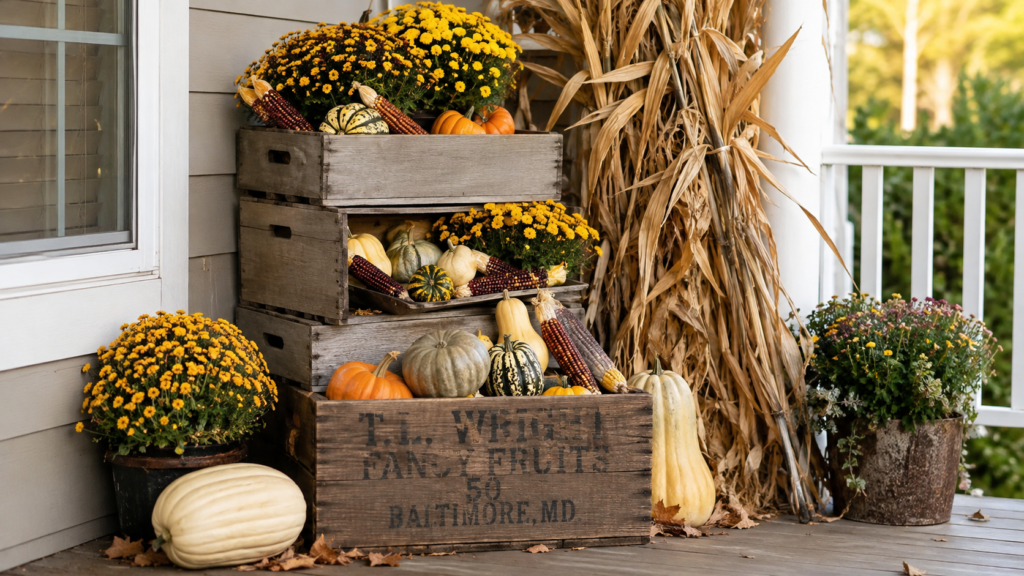
Grouping wooden apple crates, tall corn stalks, and dried florals creates a cozy, rustic harvest corner that captures the rustic charm of an autumn farm stand right at home.
+-------------------------------------------------------------+
|               HARVEST CRATE VIGNETTE LAYOUT                 |
|                                                             |
|                   [ Tall Corn Stalks ]                      |
|                            ||                               |
|                  +------------------+                       |
|                  |   Crate 1 (Vert) |  <-- Top: Mum Pot     |
|                  +------------------+                       |
|                  | Crate 2 (Horiz)  |  <-- Inside: Gourds   |
|                  +------------------+                       |
|                 ( Pumpkin )  ( Basket )                     |
+-------------------------------------------------------------+
Why You’ll Love This Idea
It adds rustic character and height, making it an ideal way to fill up empty corners on large or medium porches.
Materials Needed
- 2–3 vintage-style wooden apple crates
- 1 bundle of dried corn stalks or sorghum stalks
- Zip ties or heavy twine
- 1 large potted yellow or rust potted Chrysanthemum (Mum)
- Assorted gourds, dried wheat stalks, and ornamental corn
Step-by-Step Instructions
- Secure Corn Stalks: Stand your bundle of dried corn stalks upright against a porch column or corner post and tie securely using hidden heavy-duty zip ties.
- Position the First Crate: Place your largest wooden crate vertically at the base of the corn stalks to hide the bottom cut ends and zip ties.
- Stack the Second Crate: Turn a second crate horizontally on its side next to or partially on top of the first crate to create multi-level shelves.
- Insert Heavy Anchors: Place a heavy brick or rock inside the bottom crate to weight it down against wind gusts.
- Place Floral Accents: Nestled your potted Chrysanthemum securely on top of the vertical crate so colorful blooms spill over.
- Style Crate Shelves: Arrange ornamental corn with peeled-back husks and small gourds inside the open crate shelf interiors.
- Add Floor Accents: Place a medium pumpkin and a small basket of wheat on the floor right beside the wooden crates to round out the display.
Beginner Tips
- Check thrift stores or flea markets for affordable vintage wooden crates, or buy new unfinished crates at craft stores and stain them dark brown.
- Spray dried corn stalks with clear matte outdoor acrylic spray to reduce shedding and mess.
Common Mistakes to Avoid
- Unsecured corn stalks that blow over in heavy autumn rainstorms.
- Stacking crates precariously without weighting down the base.
Styling & Decorating Ideas
Add a small chalkboard sign resting on the crate shelf reading “Harvest Welcome” or “Pumpkin Patch.”
Best Colors & Materials
- Colors: Warm chestnut brown wood, bright mustard yellow mums, deep burgundy red, golden straw.
- Materials: Reclaimed wood, natural jute twine, dried corn husks, terracotta pots.
Quick Spec Sheet
- Estimated Cost: $45 – $75
- Estimated Time: 45 minutes
- Difficulty Level: Easy to Intermediate
- Where It Looks Best: Porch corners, beside support columns, or next to an entry bench.
- Pinterest-Worthy Tip: Fan out the dried husks of ornamental flint corn to reveal vivid purple, red, and yellow kernels before placing them on crates.
Conclusion
This rustic harvest vignette creates nostalgic farm-fresh cozy fall porch magic, filling open corners with texture, vibrant warm color, and authentic seasonal spirit.
5. The Plush Cozy Fall Seating Nook
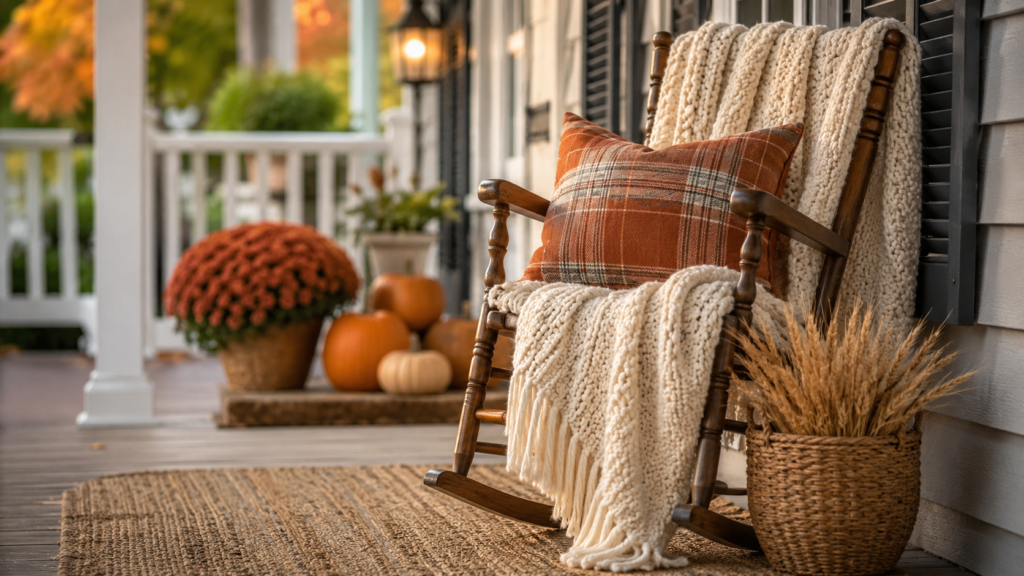
Transform an existing porch bench, rocking chair, or swing into an irresistible reading nook using soft layered textiles, warm throw blankets, and accent pillows.
+-------------------------------------------------------------+
|                  COZY SEATING NOOK LAYOUT                   |
|                                                             |
|           +-------------------------------------+           |
|           |  Pillow 1    Pillow 2    Pillow 3   |           |
|           |  (Plaid)    (Neutral)   (Textured)  |           |
|           +-------------------------------------+           |
|           |    [ Chunky Knit Throw Blanket ]    |           |
|           +-------------------------------------+           |
|           |  Porch Bench / Rocker / Wooden Seat |           |
|           +-------------------------------------+           |
|             ( Side Basket with Extra Blanket )              |
+-------------------------------------------------------------+
Why You’ll Love This Idea
It turns your porch from a simple passage into a functional, comfortable outdoor room where you can sip coffee and enjoy chilly autumn mornings.
Materials Needed
- Outdoor bench, wooden porch swing, or set of rocking chairs
- 1 heavy chunky knit or fleece throw blanket
- 2–3 outdoor seasonal accent pillows (mix patterns like plaid and solid wool)
- Woven storage basket (sea grass or rattan)
- Outdoor fabric protectant spray
Step-by-Step Instructions
- Clean Outdoor Seating: Wipe down your bench or rocking chairs to remove outdoor dust and pollen before adding textiles.
- Apply Fabric Protector: Spray all outdoor throw pillows with fabric protectant to shield against moisture spots and dirt.
- Drape Base Throw: Drape a chunky knit throw blanket casually across one arm or seat edge of the bench, allowing it to hang down softly.
- Arrange Pillow Base: Place your largest neutral pillow upright against the back corner of the seat.
- Layer Accent Pillows: Layer smaller patterned fall pillows (like burnt orange plaid or faux shearling) in front of the larger base pillow.
- Set Floor Basket: Position a small woven basket at the base of the bench and fill it with an extra folded throw or dried wheat stalks.
- Final Comfort Check: Fluff all pillows and adjust throw folds for an inviting, casual, lounge-ready look.
Beginner Tips
- Use weather-resistant outdoor pillow inserts so they retain their fluffy shape even in high outdoor humidity.
- Bring delicate knit throw blankets indoors during heavy rainy weather to keep them fresh.
Common Mistakes to Avoid
- Overcrowding the bench with too many pillows so no one can actually sit down.
- Using thin indoor fabrics that fade quickly when exposed to direct sunlight.
Styling & Decorating Ideas
Mix textures freely—pair a smooth leather pillow with a fuzzy bouclé or chunky cable-knit throw blanket for cozy contrast.
Best Colors & Materials
- Colors: Warm terracotta, cream ivory, deep navy plaid, warm cinnamon brown.
- Materials: Chunky chenille, faux fur, woven rattan, brushed wool blends.
Quick Spec Sheet
- Estimated Cost: $40 – $80
- Estimated Time: 15 minutes
- Difficulty Level: Very Easy
- Where It Looks Best: On porch benches, outdoor swings, or a pair of wooden rocking chairs.
- Pinterest-Worthy Tip: Toss an open book and an mug onto a small wooden side table next to the bench to create a cozy, lived-in aesthetic.
Conclusion
A soft, layered seating nook adds functional luxury to your entryway, encouraging slow mornings, warm conversations, and crisp autumn outdoor living.
6. Scented Eucalyptus & Cinnamon Front Door Wreath

Upgrade from standard plastic leaf wreaths by crafting or hanging a fragrant, organic front door wreath built with dried silver dollar eucalyptus, cinnamon sticks, and subtle autumn foliage.
+-------------------------------------------------------------+
|                 SCENTED WREATH CONSTRUCTION                 |
|                                                             |
|                      /-------------\                        |
|                     /   Eucalyptus   \                      |
|                    |     Branches     |                     |
|                    |  +------------+  |                     |
|                    |  | Cinnamon   |  |                     |
|                    |  | Bundle Ribbon| |                    |
|                    |  +------------+  |                     |
|                     \   & Berries    /                      |
|                      \-------------/                        |
+-------------------------------------------------------------+
Why You’ll Love This Idea
Not only does it look soft, modern, and high-end, but every time someone opens your front door, they are greeted by a natural, warm autumn scent.
Materials Needed
- 18-inch grapevine wreath frame
- Fresh or preserved silver dollar eucalyptus branches
- 5–6 whole cinnamon sticks
- Dried orange slices and brown pinecones
- Floral wire and hot glue gun
- Velvet hanging ribbon (2-3 inches wide, rust or mustard color)
- Over-the-door wreath hook or clear adhesive heavy-duty hook
Step-by-Step Instructions
- Prepare Wreath Frame: Lay your grapevine wreath frame down on a clean work table.
- Weave Eucalyptus: Tuck stems of eucalyptus around the grapevine frame in a sweeping counter-clockwise direction, securing with thin floral wire.
- Bundle Cinnamon Sticks: Bundle 3 cinnamon sticks together with twine and glue them to the bottom corner of the wreath frame using hot glue.
- Attach Dried Oranges: Tuck 4–5 dried orange slices into the eucalyptus leaves and secure them with hot glue points for bright color pops.
- Add Accent Pinecones: Wire 3 small pinecones near the cinnamon stick bundle to create a cozy visual focal anchor point.
- Tie Velvet Hanging Ribbon: Loop a wide velvet ribbon through the top center of the wreath frame, leaving long trailing ribbon tails.
- Hang and Trim: Hang your completed wreath on your front door and trim any loose, wild eucalyptus stems for a balanced shape.
Beginner Tips
- You can easily dry your own orange slices by baking thin orange slices at 200°F (90°C) for 3 hours on parchment paper.
- Add 2-3 drops of pure cinnamon or clove essential oil directly to the back of the grapevine wreath frame once a week to refresh the scent.
Common Mistakes to Avoid
- Making the wreath so thick that it gets squished between your main front door and the outer glass storm door.
- Relying solely on hot glue outdoors without floral wire backing (hot glue can fail during rapid temperature changes).
Styling & Decorating Ideas
Keep the foliage asymmetrical—decorate only 2/3 of the grapevine frame, leaving part of the rustic twisted wood exposed for a modern boho feel.
Best Colors & Materials
- Colors: Muted olive/sage green, deep rust orange, warm cinnamon brown, creamy tan.
- Materials: Grapevine branches, dried eucalyptus, natural cotton ribbon, dried citrus.
Quick Spec Sheet
- Estimated Cost: $20 – $40
- Estimated Time: 45 minutes
- Difficulty Level: Easy to Intermediate
- Where It Looks Best: Centered on the front entrance door.
- Pinterest-Worthy Tip: Leave long velvet ribbon tails that hang down 12–18 inches below the wreath bottom for elegant motion and soft drape.
Conclusion
A fragrant eucalyptus wreath combines organic greenery with inviting seasonal scents, giving your door a stylish, boutique-inspired touch.
7. Galvanized Bucket & Wild Floral Mum Stairs
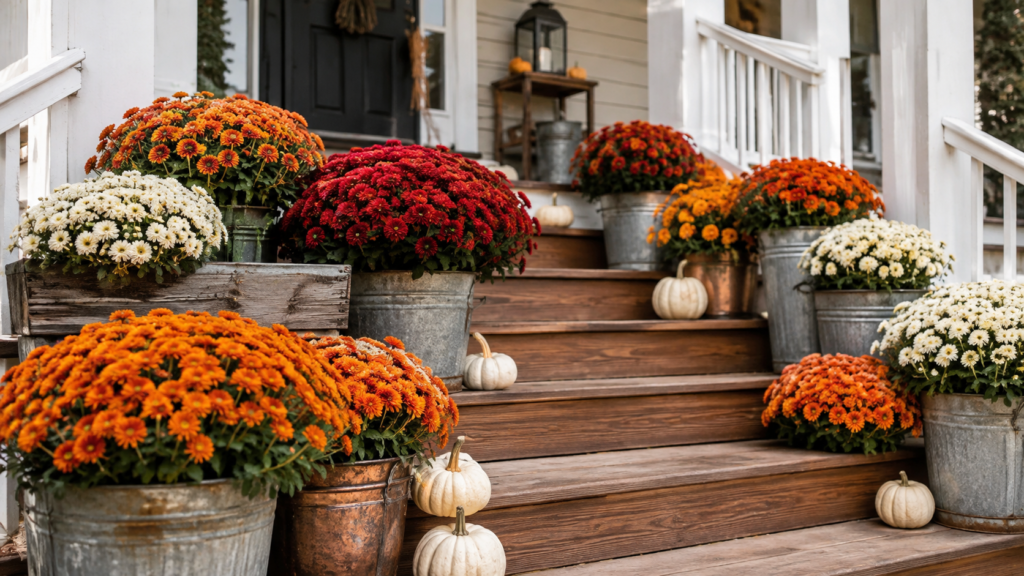
Transform your front steps into a cascade of vibrant color and rustic textures by arranging potted Chrysanthemums inside industrial galvanized buckets, rustic copper tubs, and woven baskets.
+-------------------------------------------------------------+
|                  STAIRWAY FLORAL CASCADE                    |
|                                                             |
|   Step 3 (Top):    [ Small Copper Pot ] -> Orange Mums      |
|   Step 2 (Middle): [ Galvanized Bucket ] -> Yellow Mums     |
|   Step 1 (Bottom): [ Woven Basket ]     -> Burgundy Mums    |
+-------------------------------------------------------------+
Why You’ll Love This Idea
It turns blank, boring concrete or wooden outdoor stairs into a lush, colorful garden path filled with rich autumnal beauty.
Materials Needed
- 3–5 potted Chrysanthemums (mix colors like burgundy, deep yellow, and rust)
- Assorted metal containers (galvanized buckets, vintage watering cans, copper tubs)
- Plastic plant saucers to catch water drainage
- Small ornamental pumpkins for accent filler
- Potting soil or gravel for balancing pots
Step-by-Step Instructions
- Prep Buckets for Drainage: Place plastic saucers inside the bottom of your decorative galvanized buckets so standing water doesn’t rust through or spill on stairs.
- Select & Prune Mums: Trim away dead leaves or yellow stems from your potted mums before placing them in containers.
- Drop Mums into Containers: Leave mums in their plastic nursery pots and drop them directly inside the galvanized buckets for easy swapping.
- Arrange Containers on Steps: Place one container on each step, staggering them side-to-side (left, right, left) to create a visual zig-zag cascade.
- Balance Container Styles: Alternate metal galvanized buckets with warm copper pots or woven baskets for rich texture variety.
- Add Base Fillers: Surround the base of each container with two mini pumpkins or gourds on each stair tread.
- Water Regularly: Water mums at the root level beneath leaves every 1–2 days to keep blooms looking crisp, full, and vibrant.
Beginner Tips
- Buy mums when their flower buds are still mostly closed so they bloom continuously throughout autumn on your porch.
- Water mums at the base/soil level—getting water on flower petals causes them to rot and turn brown faster.
Common Mistakes to Avoid
- Forgetting drainage saucers, leading to water accumulation and root rot inside sealed buckets.
- Crowding the steps so much that guests don’t have safe room to place their feet when walking up.
Styling & Decorating Ideas
Mix deep purple or burgundy mums with golden yellow mums for a bold, high-contrast jewel-toned entry display.
Best Colors & Materials
- Colors: Deep plum, rich mustard yellow, fiery copper orange, rustic silver zinc.
- Materials: Galvanized zinc, hammered copper, natural terracotta, live floral foliage.
Quick Spec Sheet
- Estimated Cost: $30 – $60
- Estimated Time: 25 minutes
- Difficulty Level: Easy
- Where It Looks Best: Lined up along porch entryway steps or stoop stairways.
- Pinterest-Worthy Tip: Mix in potted ornamental kale or cabbage plants alongside mums for incredible ruffled texture and unique purple-green hues.
Conclusion
Cascading potted mums in vintage metal buckets give your entryway steps an instant burst of farm-fresh energy, life, and radiant fall color.
8. Soft Overhead Fairy Light & Garland Canopy
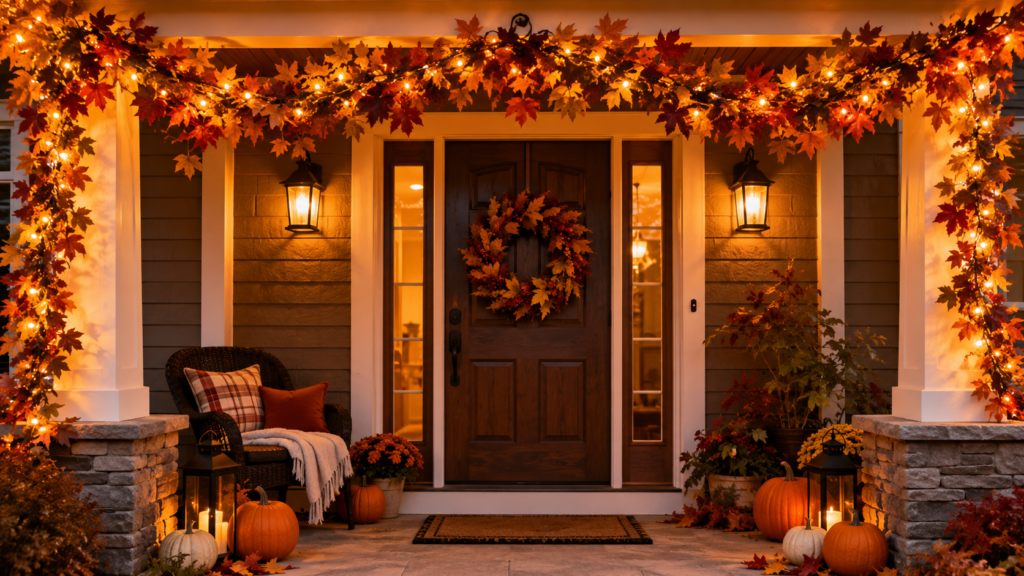
Frame your entire porch entryway by hanging a garland of fall leaves interwoven with delicate, warm fairy lights along the porch roof frame or door trim.
+-------------------------------------------------------------+
|                 OVERHEAD GARLAND CANOPY                     |
|                                                             |
|   =======================================================   |
|   \\__/*  Faux Autumn Leaf Garland & Fairy Lights  *\_//   |
|     ||                                             ||       |
|   +----+                                         +----+     |
|   |    |                 DOORWAY                 |    |     |
|   |    |                                         |    |     |
+-------------------------------------------------------------+
Why You’ll Love This Idea
It elevates your decor, wrapping your entire porch in a warm, romantic ambient canopy that looks breathtaking both day and night.
Materials Needed
- 2–3 strands of high-quality faux autumn leaf garland (maple or oak)
- 1–2 strands of outdoor warm white LED string fairy lights (preferably plug-in or solar-powered)
- Outdoor Command hooks or clear cable clips
- Green zip ties or floral twist wire
- Outdoor extension cord (if using plug-in lights)
Step-by-Step Instructions
- Clean Mounting Surfaces: Wipe down the door trim or porch roof overhang where clips will be attached to ensure proper adhesion.
- Install Mounting Hooks: Place heavy-duty outdoor Command hooks every 1.5 to 2 feet across the top and sides of your doorway overhang.
- Combine Garland & Lights: Lay your fall leaf garlands flat on the floor and weave the strand of fairy lights through the foliage using green twist wire.
- Hang Main Garland: Lift the light-infused garland and anchor it firmly onto the installed outdoor hooks, letting corners drape down naturally.
- Adjust Garland Hang: Allow the garland to bow slightly downward in gentle, soft swoops between hooks rather than pulling it completely tight.
- Hide Electrical Cords: Run lower light cords down behind outdoor planters or columns, securing them neatly with clear clips.
- Plug In and Enjoy: Turn on the lights at dusk to adjust leaf placement and ensure an even, magical glow across the archway.
Beginner Tips
- Use warm white LED lights (2700K color temperature) rather than cool blue-tinted lights to maintain a cozy, golden autumn atmosphere.
- Connect lights to a smart outdoor plug so you can control your porch lighting with your smartphone or voice assistant.
Common Mistakes to Avoid
- Using non-waterproof indoor fairy lights that short-circuit during early autumn rainstorms.
- Using metallic staples or nails that damage outdoor door trim or pierce electrical wiring.
Styling & Decorating Ideas
Interweave small strands of faux dried berries and mini pinecones into the garland alongside lights for extra texture during daytime hours.
Best Colors & Materials
- Colors: Deep amber, burnt maple red, golden yellow leaf tones, warm 2700K light glow.
- Materials: Silk leaves, copper wiring, flexible plastic garland stems, weather-rated clips.
Quick Spec Sheet
- Estimated Cost: $35 – $60
- Estimated Time: 40 minutes
- Difficulty Level: Intermediate
- Where It Looks Best: Hung across porch roof arches, over front door frames, or wrapped along porch railings.
- Pinterest-Worthy Tip: Turn off all overhead porch lights at night and let the warm fairy light garland serve as soft, ambient ambient lighting for social media photos.
Conclusion
An overhead glowing garland canopy crowns your porch with enchanting warmth, completing your seasonal makeover with magical evening glow.
Pro Decorating Tips for a High-End Look
Achieving a polished, designer-worthy porch requires attention to scale, balance, and fine details. Here are professional interior design secrets to raise your porch styling to the next level:
- Follow the Rule of Odd Numbers: Always group decorative objects (like pumpkins, lanterns, or pots) in clusters of 3 or 5. Odd-numbered groupings look more natural, visual dynamic, and pleasing to the eye than paired even numbers.
- Mix Your Textures: Combine rough rustic items (wood crates, woven baskets, burlap) with soft smooth textures (velvet ribbons, knitted wool throws, glossy ceramic pots) to create visual depth.
- Anchor with Height: Avoid keeping all your decor at floor level. Use tall corn stalks, vertical crates, stacked pumpkin towers, or hanging garlands to draw the eye upward and fill empty vertical wall spaces.
- Establish a cohesive Color Palette: Stick to 3 core colors (e.g., Terracotta, Cream White, and Sage Green) across all decor elements so your porch looks harmoniously planned rather than cluttered.
Smart Budget-Saving Tips
Creating cozy fall porch magic does not mean clearing out your savings account. Here is how to decorate beautifully while keeping costs low:
+-------------------------------------------------------------+
|                  BUDGET-FRIENDLY FALL DECOR                 |
|                                                             |
|  [ Nature Foraging ] -> Pinecones, Acorns, Fallen Leaves    |
|  [ Thrift Stores ]   -> Wood Crates, Baskets, Brass Lanterns |
|  [ Multi-Use ]       -> Faux Greenery & Timeless Lanterns   |
+-------------------------------------------------------------+
- Forage in Your Backyard: Collect real pinecones, acorns, dry branches, and colorful fallen oak leaves from outdoor parks or your garden for free accent fillers.
- Shop Thrift Stores First: Thrift shops and secondhand stores are packed with affordable wooden crates, brass lanterns, wicker baskets, and terracotta pots that cost a fraction of retail prices.
- Invest in Multi-Season Bases: Buy high-quality neutral lanterns, woven rugs, and wooden crates that work year-round—simply swap out pumpkins for pine garlands in winter or flowers in spring.
- Buy Faux Greenery Late in Season: Grab artificial garlands and foam pumpkins during late-season clearance sales to store away for next autumn.
Frequently Asked Questions (FAQs)
1. When should I start decorating my front porch for fall?
Most home decorators begin setting up their fall porch decor between late September and early October. This timing aligns perfectly with cooler weather and allows real pumpkins and mums to stay fresh through Halloween and Thanksgiving.
2. How do I keep real pumpkins from rotting on my porch?
To extend the life of real pumpkins, wash them with a mild solution of water and a tablespoon of bleach to kill surface bacteria. Once dry, seal them with clear acrylic spray paint or coat them lightly with petroleum jelly. Always keep real pumpkins elevated off bare concrete or wet wood using cardboard or trivets.
3. How can I protect my porch decor from strong wind storms?
Weight down lightweight items like empty wooden crates or woven baskets with heavy rocks or bricks placed inside. Use zip ties or garden floral wire to anchor tall corn stalks and garlands to porch posts and railings.
4. What are the longest-lasting fall plants for front porch pots?
Chrysanthemums (Mums), Ornamental Kale and Cabbage, Pansies, and Fountain Grass are extremely cold-tolerant plants that thrive in crisp autumn weather and resist light frost.
5. How do I choose the right size rug for my layered front doormat?
Your bottom patterned accent rug should generally measure 2′ x 3′ or 3′ x 5′, while your top natural coir doormat should measure 18″ x 30″. Ensure there is a visible 3 to 6-inch border of the base pattern around all sides of the top mat.
6. Can I leave fall textiles like blankets and pillows outdoors?
It is best to use outdoor-rated fabrics made from solution-dyed acrylic or polyester that resist water and mildew. If you choose standard knit throws or indoor pillows, bring them inside during heavy rain showers or long damp nights.
7. How do I decorate a very small front stoop without creating clutter?
Focus entirely on vertical space. Hang a rich autumn wreath on the door, mount a hanging light garland over the doorway, and set down a single stacked pumpkin tower or a layered doormat. This keeps floor space open while adding full seasonal style.
8. What is the best autumn color scheme for modern house exteriors?
For modern black, white, or grey houses, stick to a sophisticated neutral palette of creamy whites, muted sage greens, warm ochre, and natural woven wood tones. If your home has warm brick or beige siding, traditional rich rust oranges, deep red mums, and warm bronze accents look best.
Final Thoughts
Creating a welcoming, warm front entrance is one of the most rewarding home projects you can undertake during autumn. By blending cozy layered textiles, glowing lights, rich organic foliage, and natural harvest elements, you transform your house into an inviting sanctuary that brings joy to your family, delights your neighbors, and leaves guests feeling instantly welcome.
Remember, you don’t need to try all eight ideas at once! Pick two or three setups that fit your space and personal aesthetic best, take your time styling them over a crisp weekend, and enjoy the magical autumn atmosphere you’ve created.
Loved These Ideas? Save This Pin!
Don’t lose these ideas when it’s time to start decorating! Click the Pinterest Save button on your screen or pin the image below directly to your “Fall Home Decor,” “Porch Inspiration,” or “Autumn DIY Projects” board so you can easily reference these tutorials, step-by-step guides, and shopping lists all season long! 🍁🎃✨